
The Process
To assess which distortion pattern is occurring, you need to do two things. Firstly assess the muscles that are involved. There is a group of muscles that are involved in pelvic stability and motion. Noting which ones are tight will indicate which distortion pattern you have.
Due to the distortion you will also see postural changes.
You can have 2 distortion patterns, but if you do it will be a combination of either an LFP or RFP with an ATP or a PTP. You can not have an LFP and a RFP, or an ATP and a PFP. Phew…
So to simplify – your spine may be a sway back and still be twisted forward on one side also. Or you can have a flat spine and the twisted pelvis on one side.
To assess the muscles, all you need to do is stretch them.
Muscles should be roughly equal each side. So if you stretch your hamstrings, you should be able to reach a certain distance towards your knee that is similar on the right and the left.
Don’t be to pedantic, relax as you stretch and you will see changes if present. The primary assessment is the key, these two muscles indicate which pattern you have.
If this is not clear, then you can look at certain postural clues in a mirror.
Remember, I am only an email away if you can’t determine which pattern you have. Send me the results of the muscles and a photo of you from the front, back and side, and I can determine the pattern for you.
But now…
Primary Assessment
The Hamstrings and Hip Flexors are the two biggest causes of pelvic imbalances. They pull the pelvis out of alignment and are easy to detect if tight.
Please Note: Although these determine the pattern, you still need to assess the other muscles to work out which you need to stretch.
Hip Flexor
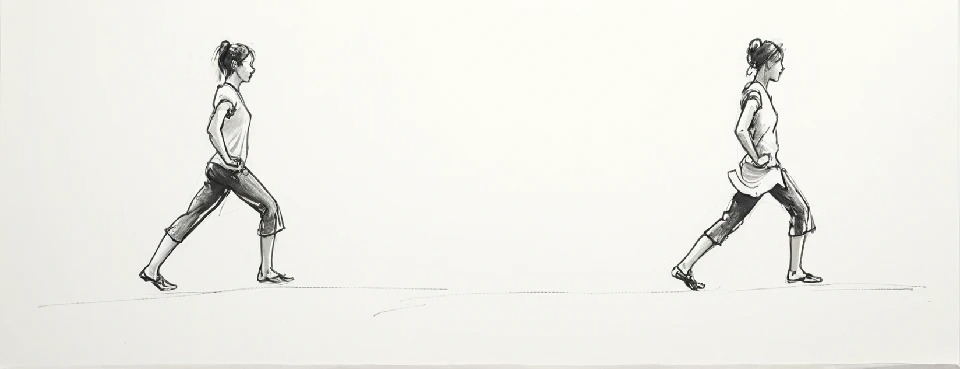 Stand with your feet staggered and the back knee slightly bent.
Tilt your pelvis backward and slowly bring your weight forward onto your front leg until a stretch is felt in front of the hip.
Keep the back in a neutral position for the stretch.
Or you can use a chair to assist:
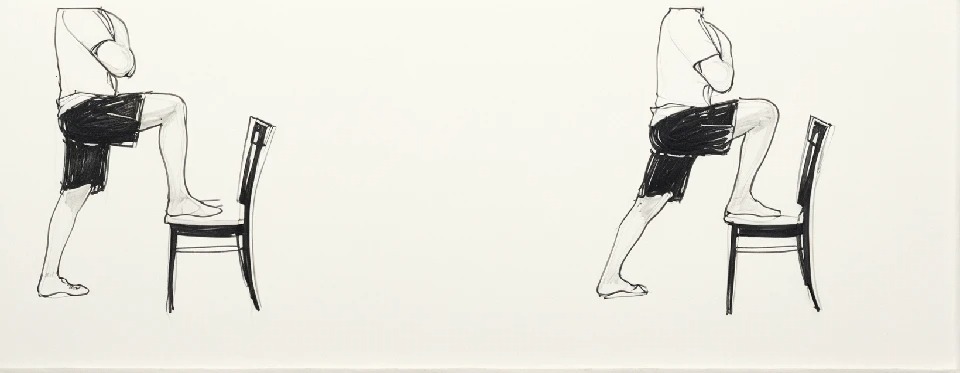 Stand in front of a chair and place the foot of one leg on the chair.
Bring your weight forward as you bend your hip as far as you can.
Maintain the stretch and return to the initial position.
(Note: You must keep your back straight when stretching the hip flexor. Also your thigh may feel tight – if so then it is most likely the Hip Flexor is tight also. Take this as a positive test result.)
Hamstring Stretch
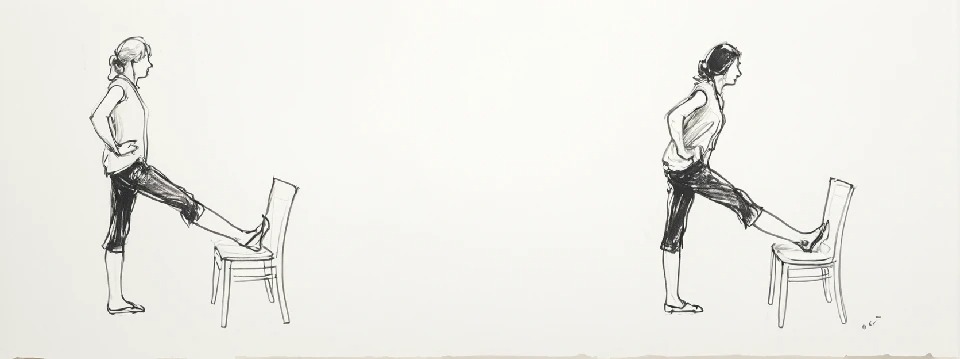 Although one of the most common stretches, this is commonly not stretched correctly.
Stand with one foot on a stool in front of you.
Straighten your leg and stick your buttock out to arch your lower back.
Lean your body forward until you feel a stretch behind your thigh.
Or an alternative stretch if standing is difficult due to pain is:
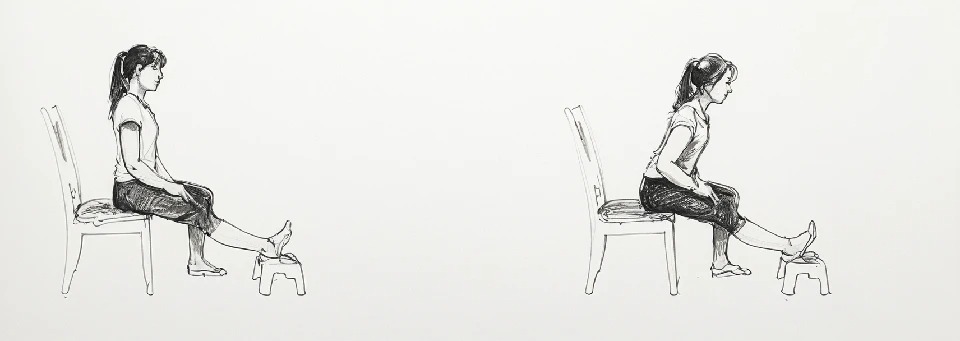
Notice which is tighter – one side to the other.
You will notice the tightness by how far your hand can travel down your leg.
From these two stretches you can determine the distortion patterns as follows.
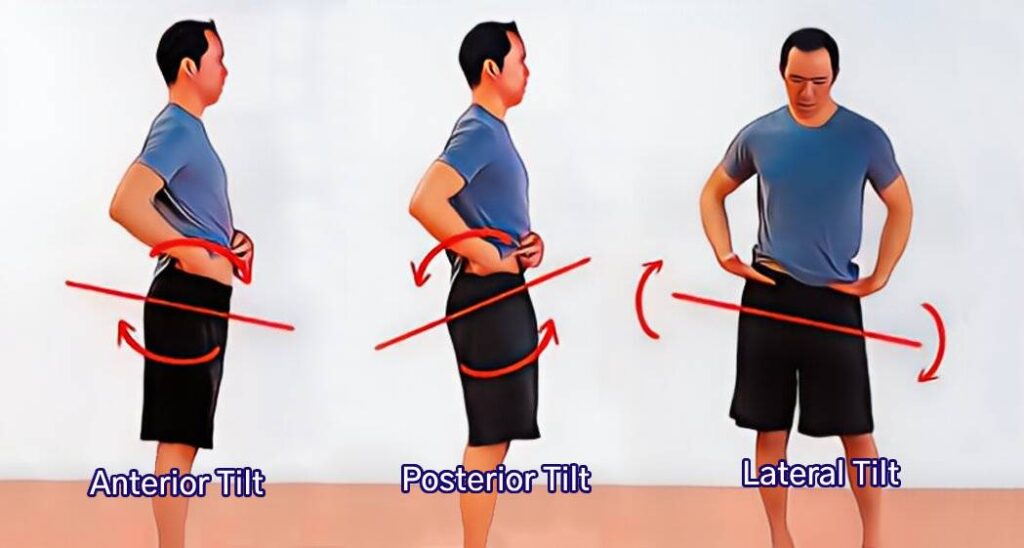
Anterior Tilted Pelvis
The muscles tight are: Hip Flexors on both sides noticed by significant restriction in the stretch.
Posterior Tilted Pelvis
The muscles tight are: Hamstrings on both sides are tight and you may not be able to stretch too much past your lower leg.
Left Forward Pelvis
The muscles tight are: Left Hip Flexors, Tight Right Hamstrings.
Right Forward Pelvis
The muscles tight are: Right Hip Flexors, Tight Left Hamstrings.
Only use this to either clarify the primary assessments. You can still use assessment below to just see the changes that have occurred from all the muscle and joint imbalances.
You can stand in front of a mirror or even take a photo of yourself if you may find that easier to look at clues (using a ruler to see imbalances can be a simple thing to do)
You will need a photo from the front and side. Do not try to be overly analytical. Just notice the changes, they may not be large but they should reinforce the muscle distortions seen.
In front of a mirror place your finger tips or thumb, either on the top of your pelvis on the side or on the ASIS which is the bony prominence of bone on the front and top of the pelvis. Stand in a comfortable position, close your eyes and wait 10-20 seconds, relax and then open your eyes and assess the imbalance.

The following the distortion patterns you may see:
Anterior Tilted Pelvis
Looking at your self from the front you will not see any changes, your hips will be level, as will your shoulders.
The main changes are noted from looking side on. A sway back is evident looking side-on, you will most likely have a more rounded upper back. If you put your fingers on the bony prominences on the front and back of your pelvis, you will notice an increased angle pointing down at the front.
Posterior Tilted Pelvis
Again changes are seen side-on. Your lower spine will appear flattened, as will the rest of your spine. Placing your fingers on the bony prominences will show a more. level angle, and possible even height.
Left & Right Forward Pelvis
The changes for these are the same, but just opposite.
So for a Left Forward Pelvis you will notice two main issues: firstly the pelvis is higher on the forward side (your left side of your pelvis is higher than your right) and “forward”. “Forward” meaning you will notice the left side of the pelvis seems forward – you may notice your belly button/navel is off to the opposite side.
If you look at yourself in the mirror, if you pull the potential Left Forward Pelvis slightly backward you may notice you seem straighter (you may also feel more aligned).
To recap: a LFP will have a left side pelvis higher and the right lower, the left side will be pushed forward. You may also notice a dropped shoulder on the right side. For a Right Forward Pelvis – the opposite – right side pelvis higher, and left lower, the right side is pushed forward, and a dropped right shoulder.
The muscles either side of the spine are commonly tight with all back or neck pain conditions. It is very easy to reduce tension in these muscles and even mobilise the joints of the spine temporarily creating quick pain relief.
The following technique is very simple to use no matter if you are at home, at work or on your travels.
Take 2 tennis balls and either tape them together so they don’t move or place them inside a sock and wind the sock around the tennis balls or tie a knot at the end, so once again they don’t move.
 Then place the tennis balls so that one is on one side of your spine and the other ball on the opposite. And your spine resting in the middle.
Rest your body weight over the tennis balls for at least 20-30 seconds or until you feel your body relax over the balls. Then move the balls up your spine by rolling sideways off the balls and moving them up a section, rolling back on top of the two tennis balls.
Use this on the painful areas of your spine or you can move up the entire spine starting at the base of your spine and then finish at the base of your skull.
PLEASE NOTE: If pain is severe it is best to use this technique initially by leaning against a wall. As you can tolerate more pressure you can do this lying down with knees bent and the balls under your body either side of your spine.
This will help ease muscle tension and mobilise joints and give you good temporary relief from pain.
 If you’ve been led to believe that stretching and strengthening are the only ways to fix back pain, it’s time to think again.
Most people assume their pain started because of a single movement—bending over, twisting the wrong way, or lifting something heavy. But research has proven that these actions are rarely strong enough to cause pain on their own. The real issue? Micro-injuries that have been building up for months or even years, leading to muscular and joint imbalances that distort your spine and weaken your body’s natural ability to heal.
By the time you feel pain, your body has already been compensating for these imbalances for a long time. And yet, traditional treatments only focus on temporary relief rather than addressing the root cause:
❌ Stretching Only Provides Short-Term Relief – If your muscles are locked in a shortened state due to habitual reflexes, stretching doesn’t fix the underlying problem. The tightness will return because your body thinks it needs to stay that way for protection.
❌ Strength Training Can Make It Worse – Strengthening weak muscles sounds great, but if your spine is misaligned, you’re just reinforcing poor movement patterns, making the imbalances even worse.
❌ Adjustments Keep You Dependent – Regular chiropractic visits may offer temporary relief, but they don’t address why your spine keeps falling out of alignment in the first place. The same imbalances will keep pulling you out of place.
To achieve true, lasting relief, you need to go deeper—resetting muscle reflexes, realigning your spine naturally, and breaking the habitual patterns that keep pain coming back. And that’s exactly what The Back Blueprint does.
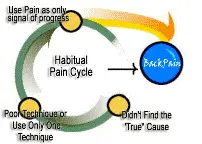 Most people don’t realise that pain isn’t just about mechanical imbalances – it’s also about habits. Your body is wired to maintain patterns, even unhealthy ones. Over time, muscular and joint imbalances become ingrained, and your body starts to believe they are ‘normal.’ That’s why pain relief never seems to last.
To break this cycle, you need to retrain your body’s natural habits so that balance and pain-free movement become your new normal. The Back Blueprint does exactly that—resetting muscle reflexes, restoring joint mobility, and reinforcing new, pain-free movement patterns.