
Jin Shin Jyutsu
(Acupressure)
Jin Shin Jyutsu (JSJ) offers gentle, effective techniques to help relieve lower back pain by harmonising energy flows in the body.
It is a very simple technique to use, please watch the video so you can understand more about the technique and how to perform it. Plus also the sequence of points that have shown to be the most effective way to ease your pain quickly but also address ALL the underlying causes of your pain.
This sequence of points you will use now and until pain has gone and even longer (more explained in the video).
Long term, checking these points every now and then along with the maintenance techniques, you will be able to remain pain free and build a resistance to any future issues.
Here are some of the best JSJ techniques to address neck and upper back discomfort:
Neck & Upper Back Pain Relief Sequence
First here is a link to download the image of the JSJ points or simply view online.
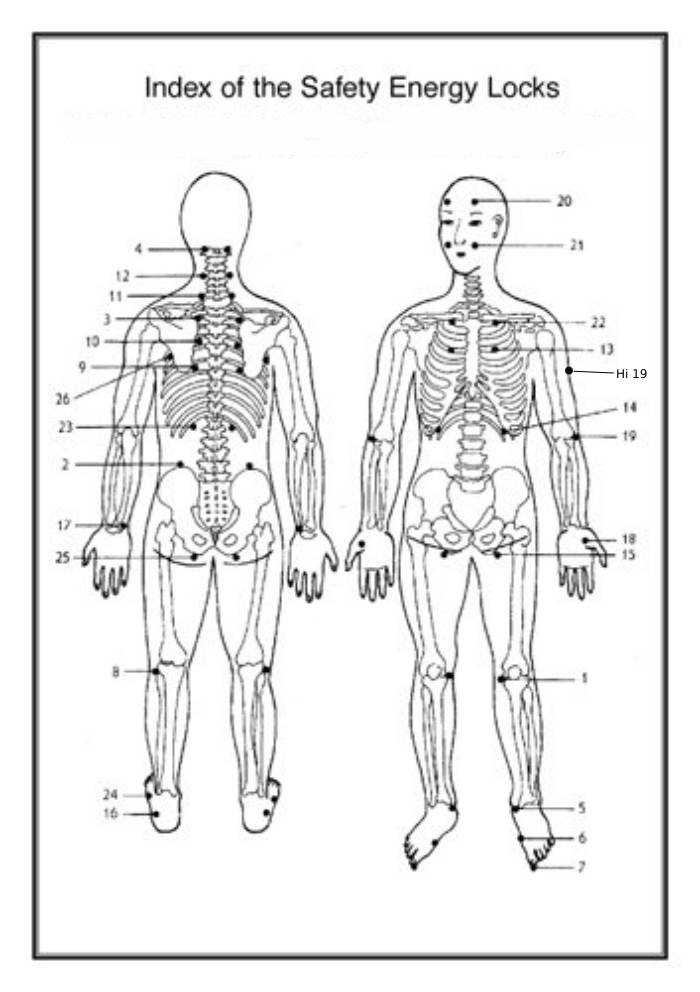
Hold each step for 3-5 minutes while breathing deeply.
Step 1: Release Neck & Skull Tension (The Root Cause)
Right Hand: SEL #4 (Base of the skull, behind the right ear) – right hand on left #4
Left Hand: SEL #11 (Top of the right shoulder, close to the neck) – left hand on left #11
- Switch sides after 3-5 minutes:
- Why?
– Clears the main energy blockages causing tightness in the neck & upper back
– Unblocks the pathway from the head down the spine
Step 2: Dissolve Shoulder & Upper Back Stiffness
Right Hand: SEL #4 (Base of the skull, behind the right ear) – right hand on RIGHT #4
Left Hand: SEL #17 (Outside wrist, just below the pinky) – left hand on RIGHT #17
– Switch sides after 3-5 minutes:
Why?
– Unwinds deep shoulder knots & tension
– Releases stress stored in the arms, which contributes to tightness in the shoulders
Step 3: Open Shoulder & Upper Back Energy Pathways
Right Hand: SEL #11 (Top of the right shoulder, just before the neck)- right hand on LEFT #11
Left Hand: SEL #25 (Sitting bone area) – left hand on LEFT #25
- Switch sides after 3-5 minutes:
- Why?
– This corrects posture imbalances and upper back tension
Step 4: Lock in Healing & Strengthen the Whole System
Both Hands: Hold SEL #1 (Inner thigh, near the groin)
– Hold for 3-5 minutes.
Why?
– Prevents future pain by harmonising the full-body energy flow
– Deeply calms the nervous system, stopping stress from triggering pain
Step 5: Deep Tension Release & Emotional Clearing
Right Hand on SEL #3/11 (Upper back, between spine & shoulder blade) – right hand on right #11/3
Left Hand on SEL #19 (Inside elbow, where the arm folds) – left hand on RIGHT #19
– Hold for 3-5 minutes.
Unblocks the energy pathway between the upper back and arms → Releases tension trapped in the shoulders and neck.
Clears emotional stress stored in the heart & upper back area → Helps with tension caused by frustration, overthinking, and mental strain.
Improves blood circulation and deep breathing → Loosens tight muscles and improves oxygen flow to the brain and spine.
Prevents recurring stiffness → By addressing the emotional + physical root cause.
Bonus:
Hold your middle finger (Releases stored frustration & tension from the nervous system).