
Jin Shin Jyutsu for Back & Neck Pain
Simple techniques to help ease pain as well as maintain a healthy spine
Your spine supports your body every day, yet stress, poor posture, and muscular tension can leave your back and neck aching. Jin Shin Jyutsu (JSJ) offers gentle, effective techniques to relieve pain, reduce tension, and maintain long-term spinal health—all without complicated exercises or medication.
Whether you’re dealing with lower back discomfort, sciatica, muscular tension, or neck stiffness, these JSJ techniques provide a natural way to support your body’s self-healing energy.
How JSJ Helps Your Spine and Back
JSJ works by using specific “safety energy locks” (SELs) or points on the body to harmonise energy flow, release tension, and support circulation. Applying these points regularly can:
- Reduce lower back pain and sciatica symptoms
- Ease muscle tension and knots in the back and neck
- Improve spinal alignment and posture
- Support long-term spinal health and flexibility
The techniques are gentle, safe, and suitable for all ages, and you can do them in just a few minutes at home.
JSJ Points for Back Pain
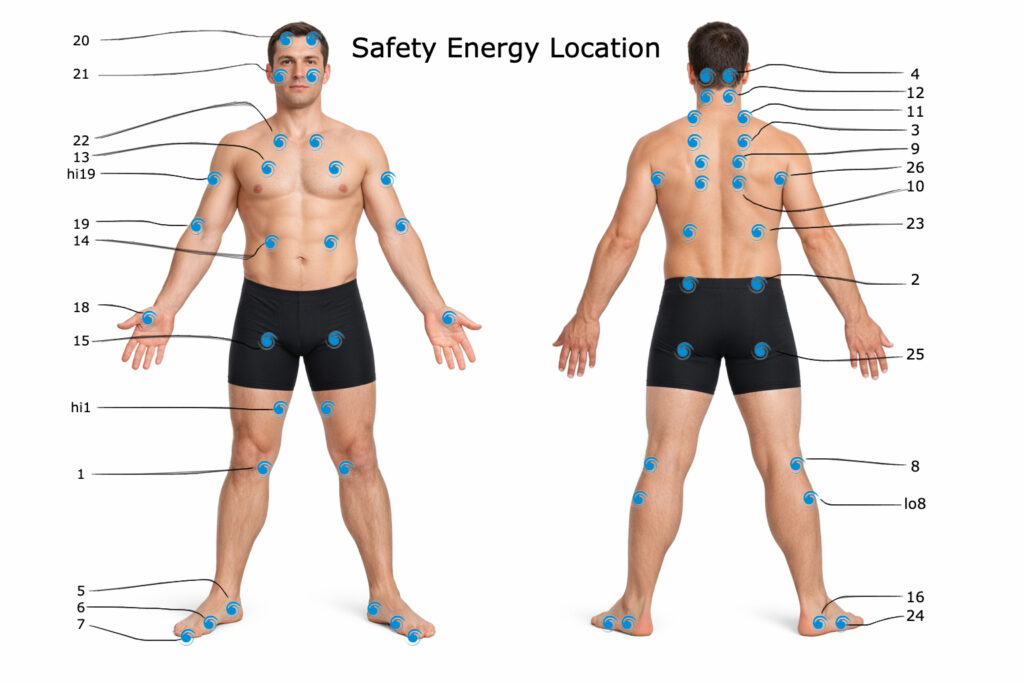
These are simple Safety Energy Locks (SELs), organ points, and energy flows—each works in its own way to support your spine. You don’t need to do every point or sequence. Once you can feel the pulse in a point, it tells you which areas need attention. For quick relief, focus on the single SELs along with the pain-relief techniques—they work together to ease tension and discomfort efficiently, even in just a few minutes.
SEL's For Back Pain
2s – Crest of the pelvis: Called the “body’s chiropractor” and helps the body alignment. It also helps us to breathe in a more relaxed fashion, and even helps the elimination functions on the body.
1s – Inside the knees: Grounds energy and supports lower-body stability for hips and back. It is called the “Prime Mover” and helps with all movement, is a great point for pain relief and anti-inflammatory effected.
15s – Groin area: Loosens muscles and improves circulation, helping lower-body flexibility. This point also affects anything waist lower, can help ease sciatica, knee pain, cold feet and more.
19s – Elbows: Is classed as our “Personal Trainer” and helps us get into and stay in balance. It helps the Adrenal Glands which are commonly rundown in most back pain cases. Relieves neck, shoulder, and upper-back tension, supporting overall spinal flow.
8s – Back of Knees: This relates to tight knotted muscles, anywhere int he body. Holding this point for 5-10 minutes and you can see muscles ease in tension in that time. Helps with back, hips and muscles in general.
Organ Energies (Meridians) For The Back
Bladder (BL) points: Hold points 12 and 25 on the same side to help release tension along the spine, ease stiffness, and reduce muscular pain. These points are effective for upper, mid, and lower back discomfort.
Kidney (KI) points: Hold pubic bone and little toe (or Hi1) points to support the spine’s foundation, improve circulation, and strengthen energy to the lower back and sacrum. If the little toe point is hard to reach, you can use the pubic bone and point 1 on the inside of the knee instead—this works just as well.
JSJ Flows for the Spinal Health
1. Stress-Related Back Pain & Muscle Tension Flow
- Sequence: 2 + opposite Hi1 → 4 → 12 → 11 → 23 (on the 2 side)
- What it does: This flow helps release stress-related tension, ease muscle tightness, and reduce inflammation along the spine and lower back.
- How to use: Hold each point gently until you can feel a pulse or a subtle softening. Focus on the side where you feel tension most.
2. Muscle-Related Back Pain Flow
- Sequence: 25 + opposite Hi1
- What it does: Specifically targets muscular back pain, helping muscles relax, reducing knots, and supporting spinal movement.
3. Third Method of Correction – Spinal Alignment
- Sequence: Sternum (3rd rib) and sacrum, then move up the spine to sore areas
- What it does: This method releases tightness along the spine, helps restore balance, and gently encourages the spine to realign naturally.
- How to use: Work slowly, holding each area lightly, and move gradually to areas that feel stiff or tender.
4. Pain Relief & Inflammation Flow
- Sequence: 5 → 16
- What it does: Supports general pain relief and reduces inflammation, especially for lower back discomfort.
- How to use: Hold each point until you notice subtle warmth or pulse, then move to the next.
5. Low Back Pain Relief Flow (2 / 15 + 1)
- Sequence: Hold SEL 2 and SEL 15 on the same side.
- Then move to hold SEL 2 and SEL 1.
- What it does: This combination is excellent for relieving low back and sacroiliac joint pain. It helps release tension in the pelvis, improves circulation through the lower spine, and encourages the back muscles to relax.
- How to use: Hold each combination gently until you feel a pulse or softening, then move to the next hold.
6. Toe Release Flow for Lower Back and SI Joint Pain
- Sequence: Hold SEL 2 while gently holding the toes one at a time from the little toe to the big toe.
- Then hold SEL 2 while placing the ring finger over the thumbnail.
- What it does: This flow is very effective for lower back pain and SI joint tension. It helps release tightness through the pelvis, legs, and lower spine while improving flexibility.
Tip:
If you cannot feel a pulse, simply notice the toes softening or relaxing, which shows the energy is moving.
EXTRA: Progressive Lower Back Flexibility Flow
After completing the sequence #6 with SEL 2, repeat the same process with:
- SEL 15 and the toes
- Then SEL 25 and the toes
What it does:
This progression helps release deeper muscle tension through the hips, pelvis, and lower back, improving movement and flexibility in the spine.
Tip: You don’t need to do all flows at once. Start with the flow that matches your type of back discomfort—muscle tension, stress-related, or inflammation—and hold points until you feel relief. These flows, combined with single SELs and organ points, provide quick and effective support for your spine.
JSJ Techniques for Neck and Upper Back Pain
Neck and upper back tension often develops from stress, posture, computer work, or physical strain. Jin Shin Jyutsu offers simple points and flows that help release tight muscles, improve circulation, and restore balance through the neck and shoulders.
By gently holding specific Safety Energy Locks (SELs), organ points, and flows, you can quickly ease stiffness and support long-term neck and upper spinal health.
SEL's for Neck Relief
SEL 4 – Base of the Skull
Located at the base of the skull, these points help release tension in the neck, head, and upper spine. Holding SEL 4 can ease stiffness, headaches, and tight neck muscles.
Hi19 – Upper Arm
Found on the upper arm, this point helps release shoulder and neck tension while improving circulation through the upper back.
SEL 12 – Midway Down the Neck
Located midway down the back of the neck, this point helps relieve neck stiffness, stress tension, and tight muscles along the cervical spine.
These three SELs work together to relax the neck muscles, improve movement, and reduce pressure in the upper spine.
Organ Points for Neck and Shoulder Balance
Bladder (BL) Points
Hold points 12 and 25 on the same side. Bladder energy runs along the back of the neck and spine, influencing the muscles and tension patterns of the upper back. These points help release tight muscles and improve circulation through the neck and shoulders.
Liver (LV) Points
Hold points 4 (base of skull) and opposite 22 (collar bone) on the same side.The Liver energy helps regulate muscle tension and stress patterns in the body.
Holding these points together helps release stress-related neck tension, ease shoulder tightness, and restore balance between the head, neck, and upper spine.
JSJ Flows for Neck and Upper Back Pain
1. Neck Energy Flow
- Sequence: 11 / 26
- What it does: Helps release tension along the neck, shoulders, and upper spine, improving circulation and reducing stiffness.
2. Neck Muscle Release Flow
- Sequence: 11 / 15 + 25
- What it does: Helps relax tight neck muscles and shoulder tension, especially from posture or prolonged sitting.
3. Energy Boost Flow
- Sequence: 11 and 19 on the same side
(placing a finger in the bend of the elbow can also boost energy) - What it does: Improves energy circulation through the neck, shoulders, and upper back, helping relieve fatigue and tension.
4. Stress Neck Relief Flow
- Sequence: 12 + same Hi19
- What it does: Particularly helpful for stress-related neck pain and tension headaches.
5. Neck and Shoulder Tension Flow
- Sequence: 4 + opposite Hi19
- What it does: Releases tightness through the base of the skull, neck, and shoulder muscles.
6. Exercise or Strain Neck Flow
- Sequence: 4 + 25
- What it does: Helps recover from exercise strain, overuse, or sudden neck stiffness.